
A pass certificate will allow you to digitally sign your Apple Wallet Passes. In addition, it is highly recommended that the certificate owner adds contact info on the back of each Pass. The contact info may include a physical contact address, email address, and/or phone number. If the certificate owner is different from the brand then the contact info of both should be displayed on the back of the Pass. The following information should be used to generate your Apple Pass Signing Certificate. Pass Certificates need to be renewed each year. Please follow the section on ‘Instructions for Renewing A Pass Certificate’ below if you need to renew your certificate. A Pass Certificate expires the following year at the exact time the Certificate was created the previous year.
Instructions for Creating a Pass Type ID & Pass Certificate: #
1. Go to https://developer.apple.com and click on “Account” in the top right corner.
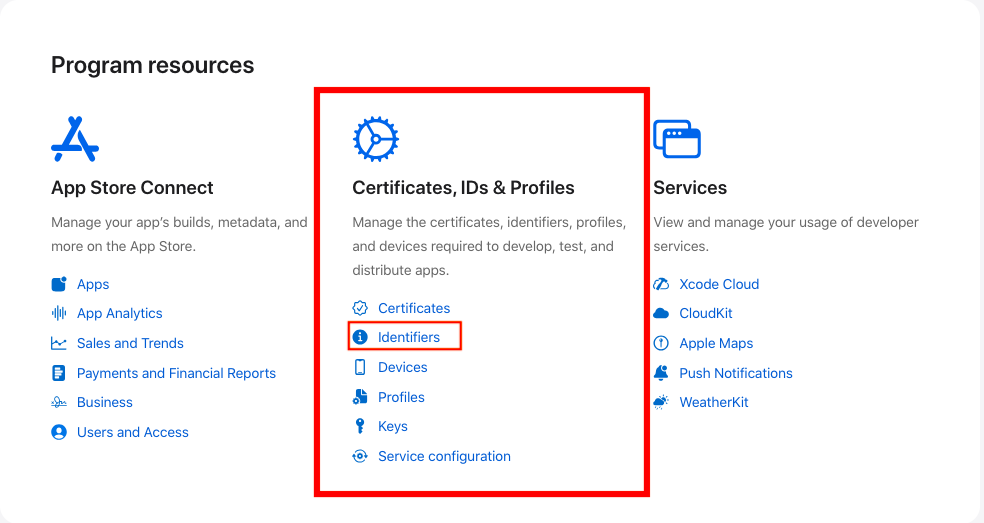
2. Login with your credentials and locate the “Certificates, IDs & Profiles” section under “Program Resources.” (If you do not already have an Apple Developer Account, you will need to register for one.) Click the “Identifiers” link.
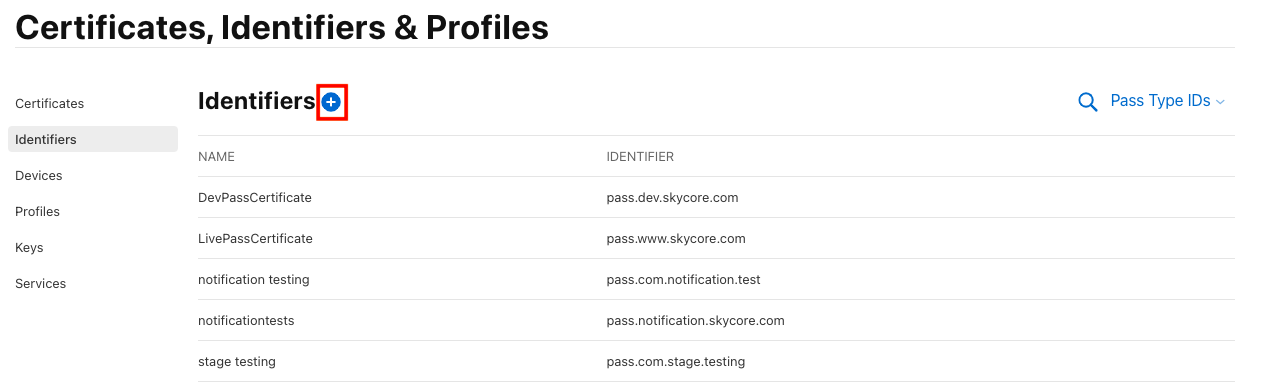
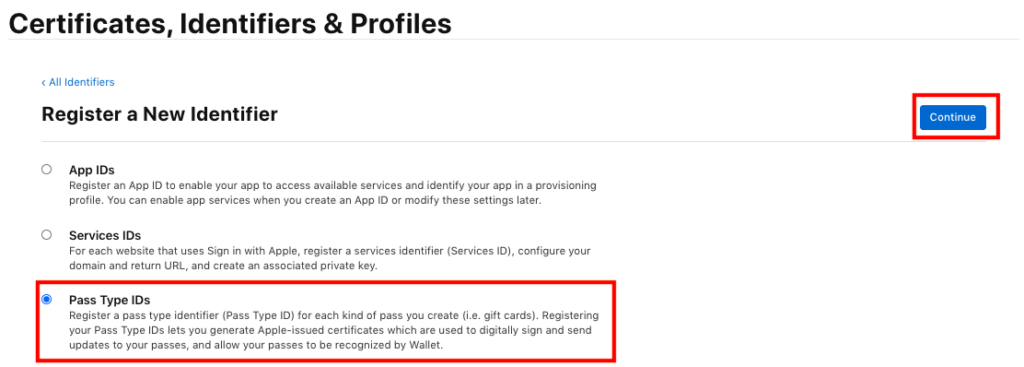
3. Click on the [+] next to ‘Identifiers’ to add a new Pass Type ID. Select the option ‘Pass Type IDs’ on the ‘Register a New Identifier’ page.
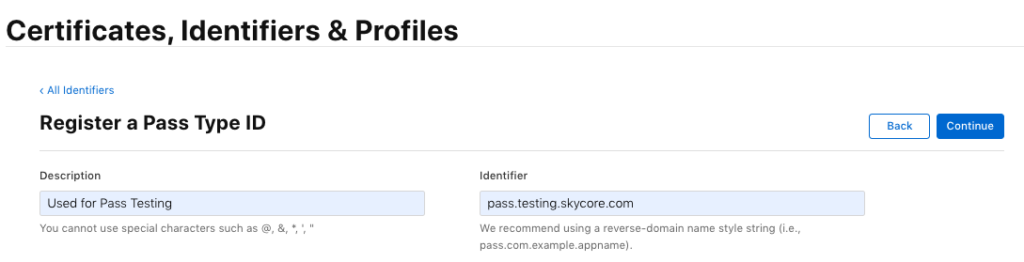
4. Under “Pass Type ID description” type in the description which will describe what this Pass Type ID represents. Keep it brief with enough detail to distinguish this Pass Type ID from your other IDs. Under, “Identifier”, type in the unique identifier for your Pass Type ID starting with the word “pass”. The identifier should use a “reverse-domain” name style (pass.com.example.appName). Click ‘Continue’.
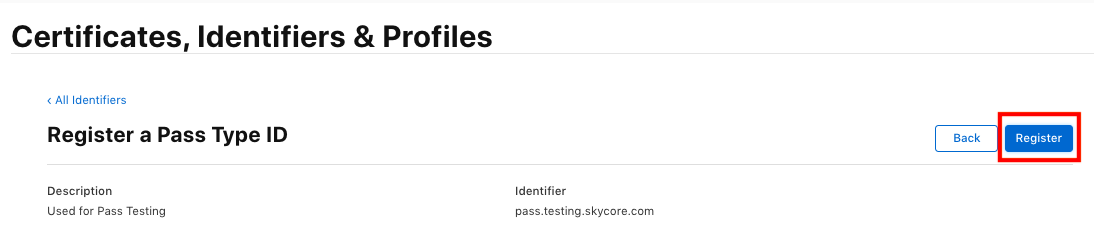
5. Confirm that your Pass Type ID information is correct then click “Register”. After clicking “Done” on the “Registration Complete” page, you will be redirected back to the Pass Type IDs page where you will be able to view the newly created Pass Type ID.
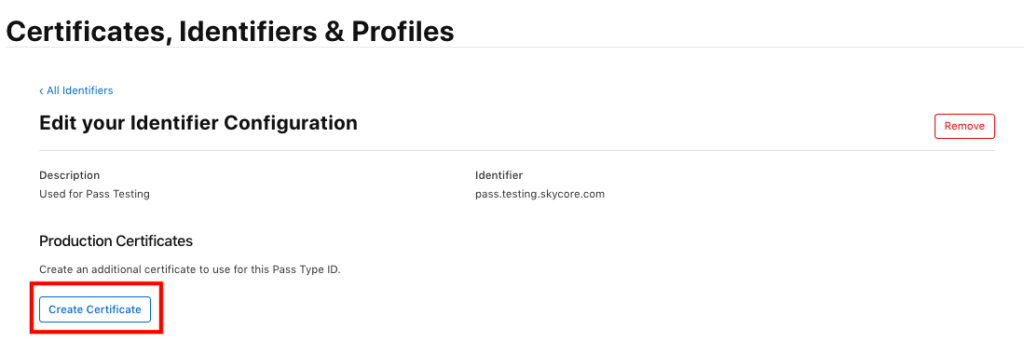
6. Click on the newly created Pass Type ID then click “Edit” to start configuring a Client SSL Certificate for this iOS Pass Type ID. Under the Production Certificates section click “Create Certificate”. Read through the instructions by clicking ‘Learn More’.
7. Locate the Applications folder on your Mac, click on Utilities, then double click on “Keychain Access.”
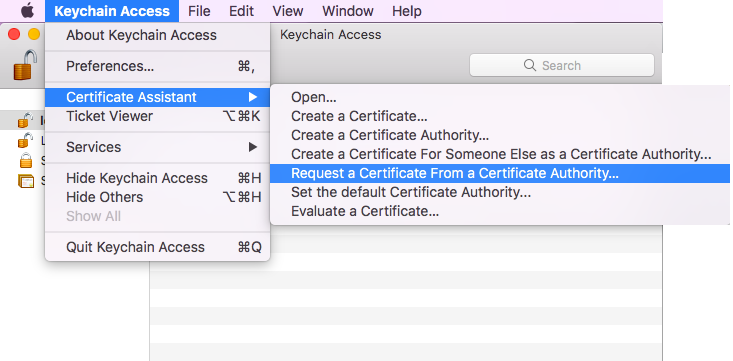
8. Click on “Keychain Access” in the top left corner of your screen. From there, choose Certificate Assistant → Request a Certificate from a Certificate Authority.
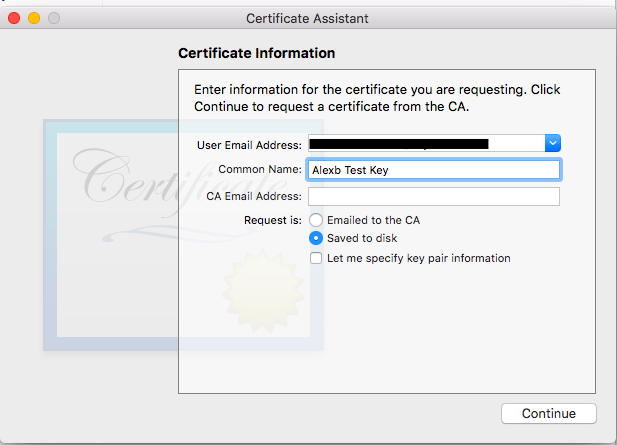
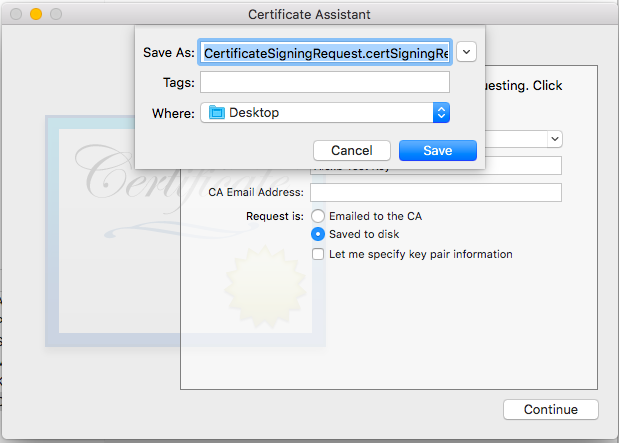
9. After clicking “Request a Certificate From a Certificate Authority” an application called “Certificate Assistant” will open. Fill in the “User Email Address” and “Common Name” fields. We suggest that you use your Apple ID for the “User Email Address” the description you used on the Apple developer portal for the “Common Name” field. The “CA Email Address” field should be left empty. For the “Request is” option, select “Saved to disk.” Click Continue, and choose where you would like to save the certificate file and click Save. You will see a “Conclusion” message confirming that the Certificate has been created on disk. Click Done.
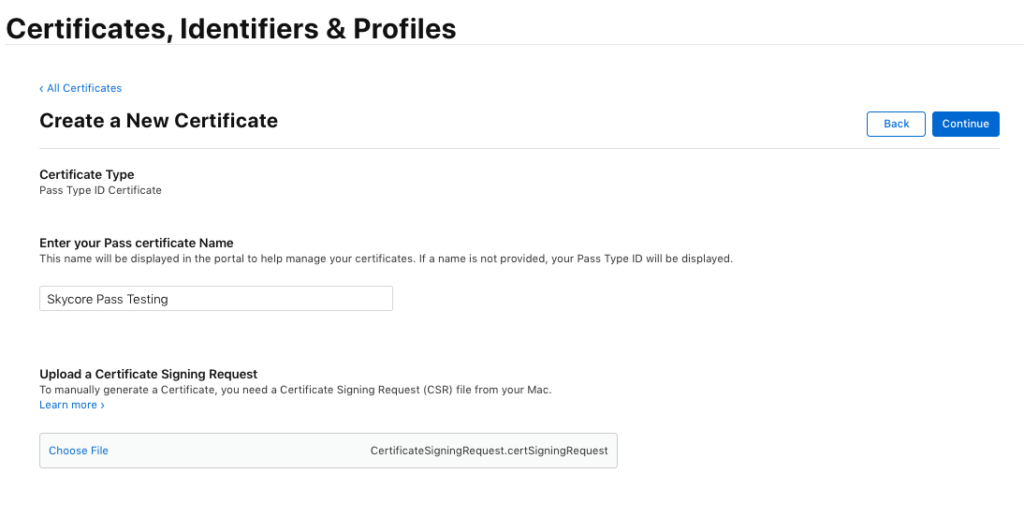
10. Switch back to your browser and click Continue on the ‘Create a New Certificate’ page. Under Upload a Certificate Signing Request, click ‘Choose File’ and select the .certSigningRequest file that you just saved to your Mac earlier and click on “Continue” and wait for your certificate to be ready for download.
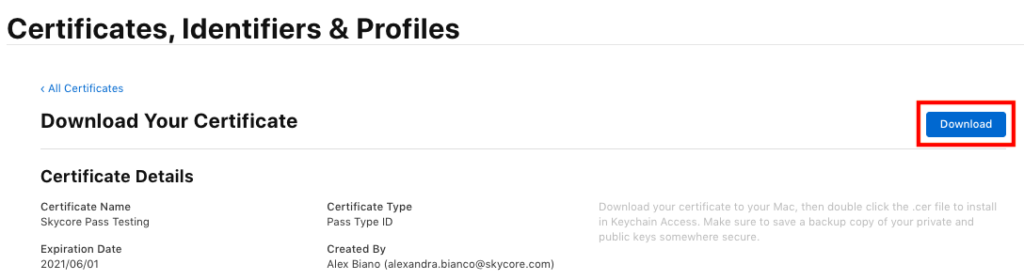
11. Click the “Download” button to download the certificate to your Mac. Save the file to your desktop as pass.cer. The Certificate creation process is completed now and you can close the browser.
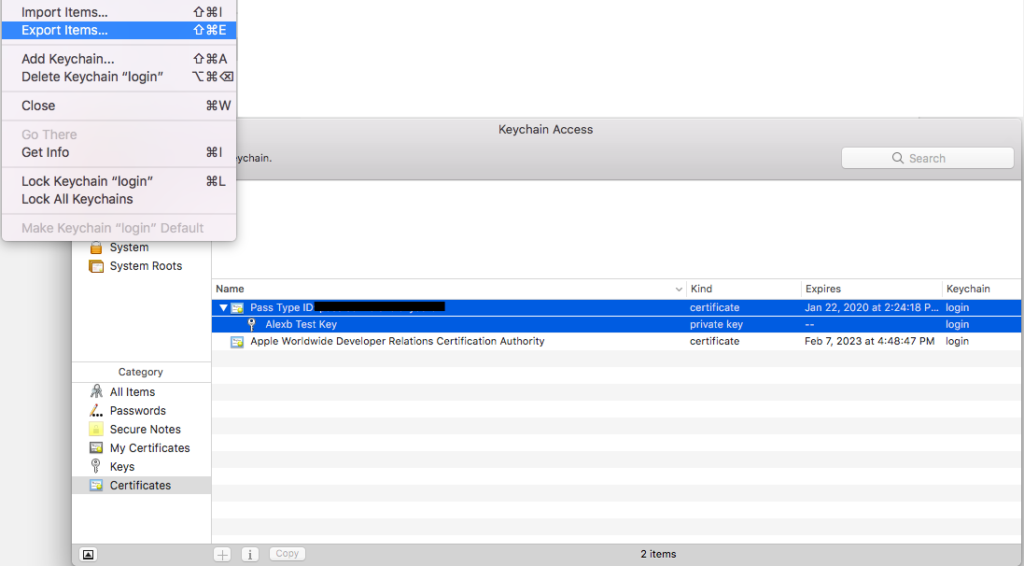
12. Locate the downloaded pass.cer file and double click on it. Keychain Access will then open. Select the login Keychain and the Certificates Category and find the certificate with a prefix of Pass Type ID followed by the identifier you chose. Click on the little gray triangle to expand the certificate and unveil the private key. Select both the certificate and the private key. Choose File → Export Items.
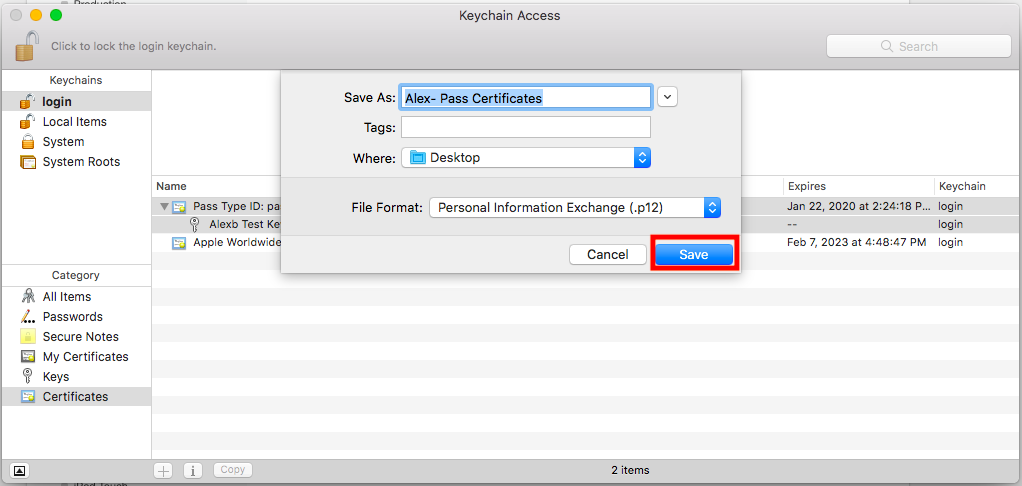
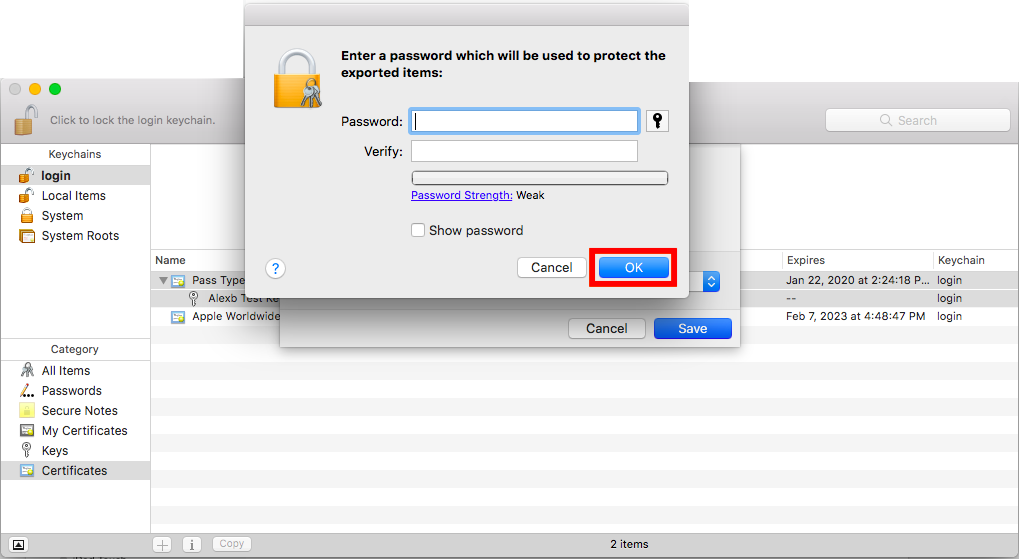
13. Choose a location and a file name. Choose File Format Personal Information Exchange (.p12) and click “Save.” Insert a password and verify it (Tip: This password is important and required for signing passes. Please save it with all the certificate and Pass Type ID information you gather at the end of the certificate creation process).
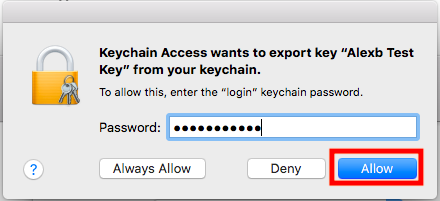
14. You’ll be asked to insert the Password of your current account on your Mac. Click “Allow” or “Always Allow.”
How to Upload Your Certificate Information in Your WalletThat Account
- Login to your WalletThat account here: https://app.walletthat.com/platform/login.php
- Navigate to the Apple & Google Wallet Settings page under the Settings tab in the left side navigation.
- Click “Add Apple Certificate”
- Enter your certificate details
- Click “Save Certificate”.
If you need additional help uploading your certificate, you can use this article: Navigating Apple & Google Wallet Settings
Instructions for Renewing a Pass Certificate: #
1. Go to https://developer.apple.com and click on “Account” in the top right corner.
2. Login with your credentials and locate the “Certificates, IDs & Profiles” section under “Program Resources.” Click the “Identifiers” link.
3. Click on the name of the Pass Type ID that you need to renew the certificate for.
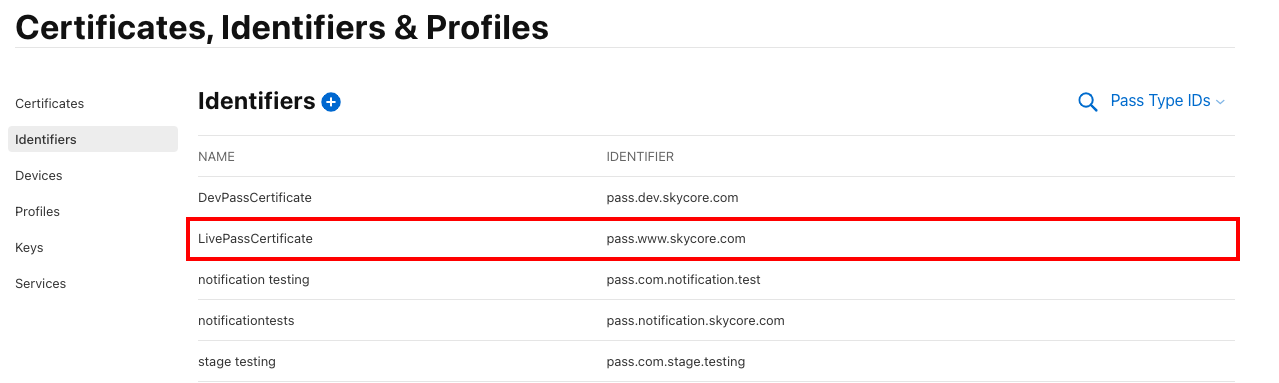
4. Under the Production Certificates section click “Create Certificate”.
5. Locate the Applications folder on your Mac, click on Utilities, then double click on “Keychain Access.”
6. Click on “Keychain Access” in the top left corner of your screen. From there, choose Certificate Assistant → Request a Certificate from a Certificate Authority.
7. After clicking “Request a Certificate From a Certificate Authority” an application called “Certificate Assistant” will open. Fill in the “User Email Address” and “Common Name” fields. We suggest that you use your Apple ID for the “User Email Address” the description you used on the Apple developer portal for the “Common Name” field. The “CA Email Address” field should be left empty. For the “Request is” option, select “Saved to disk.” Click Continue, and choose where you would like to save the certificate file, and click Save. You will see a “Conclusion” message confirming that the Certificate has been created on disk. Click Done.
8. Switch back to your browser and click Continue on the ‘Create a New Certificate’ page. Under Upload a Certificate Signing Request, click ‘Choose File’ and select the .certSigningRequest file that you just saved to your Mac earlier and click on “Continue” and wait for your certificate to be ready for download.
9. Click the “Download” button to download the certificate to your Mac. Save the file to your desktop as pass.cer. The Certificate creation process is completed now and you can close the browser.
10. Locate the downloaded pass.cer file and double click on it. Keychain Access will then open. Select the login Keychain and the Certificates Category and find the certificate with a prefix of Pass Type ID followed by the identifier you chose. Click on the little gray triangle to expand the certificate and unveil the private key. Select both the certificate and the private key. Choose File → Export Items.
11. Choose a location and a file name. Choose File Format Personal Information Exchange (.p12) and click “Save.” Insert a password and verify it (Tip: This password is important and required for signing passes. Please save it with all the certificate and Pass Type ID information you gather at the end of the certificate creation process).
12. You’ll be asked to insert the Password of your current account on your Mac. Click “Allow” or “Always Allow.”
How to Upload Your Renewed Certificate in Your WalletThat Account
- Login to your WalletThat account here: https://app.walletthat.com/platform/login.php
- Navigate to the Apple & Google Wallet Settings page under the Settings tab in the left side navigation.
- Click “Edit” in the Actions drop-down next to the certificate and corresponding Pass Type ID that you have been using to issue Passes.
- Upload your new .p12 file, enter your password and additional certificate details.
- Click “Save Certificate”.
If you need additional help uploading your renewed certificate, you can use this article: Navigating Apple & Google Wallet Settings